January 13, 2014
By Mike Schoby
 The Texas night was eerily black, as the thin shroud of clouds blotted out the normally bright stars and the waning sliver of a moon. It was a perfect night for ambushing hogs.
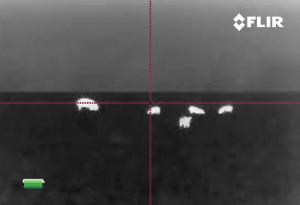
My wife slipped quietly from the open-topped Land Rover and grabbed a suppressed .308 AR-10 from the rack, flipped down her night vision goggles and disappeared into the night. I looked down at the dash-mounted LCD screen attached to a thermal camera on the hood, and watched her walk into frame.
White hot, she looked like an apparition as she worked her way to the field edge, where the bright white otherworldly image of a solitary boar could clearly be seen rooting up the field.
He never knew she was there, and I watched in silence as the distance between the two was closed. She slowly lifted the rifle, and I actually saw the white stream of the spent cartridge arc from the ejection port before I heard the muffled shot. The pig crumpled, doing his last damage to this farmer's field.
Advertisement
I was floored. I had played with night vision before, and had even bought a lower-priced monocular — which was less than impressive — but this was my first experience with thermal.
I was hunting with the guys from Tactical Hog Control. We were using their vehicle, rifles and high-end night vision/thermal gear. I was impressed to say the least.
Firing up the Rover to go retrieve my wife and her pig, I said to Clark (the owner), "Wow, I have to get a thermal scope."
Advertisement
Not wanting to be rude — but also wanting to know if this kind of equipment was even in the cards — I continued.
"What does something like this cost?"
As the saying goes, if you have to ask, you can't afford it. So my dreams of bowling over hogs and coyotes under the cloak of darkness remained just that€¦a dream.
Enter the FLIR
Since then I have tested and used various thermal monoculars/cameras as well as weapon sights, but the story has remained much the same — unaffordable at far north of $10,000. Even though prices have come down in recent years as the manufacturing process has become more refined, the price of a unit has still eluded me.
So when I recently chatted with Haley Ellison, public relations manager at FLIR, she confided they were working on a product that may be of interest to me.
"It's a weapon-mounted thermal sight."
Yes, I was interested, but I knew the price would be out of my budget.
"And it is far less expensive than anything else on the market."
With that, she got my attention.
So I got a unit sent and put it through the paces. The sight is called the FLIR ThermoSight RS and is available in six different models. The entry-level thermal unit features a 13 mm lens with 240x180 resolution and has an MSRP of $3,499.
The model I wanted to test was the higher-end unit with a 35 mm lens with 640x480 resolution and came in at $6,500. OK, I'll admit, this is still not priced for everyone, but it is legitimately a third to a half of what quality thermal weapon sights normally cost. That's a move in the right direction.
Speaking with Pat Richardson of FLIR, I asked him how they reduced the price so dramatically.
 "It is really about economy of scale. Since thermal is catching on, more units sell, especially into the automotive industry, and the more units that sell the lower the prices goes. It kind of has a snowball effect.
When the price drops we sell even more, which keeps reducing the price further. We have also been able to use many of the same components across the various lines. We also have done some innovative things like design and manufacturer our own ocular system which further brings the cost down."
Getting Started
Opening the ThermoSight RS hard case, what I immediately liked the most about this unit was its ease of use. Nothing complicated, just one simple power button on top of the device that's large enough to find in the dark. Press it down once and the unit turns on. Hold it down for a couple of seconds and the unit shuts off.
From there I decided to give it the ultimate "guy test" — try to figure it out without reading the manual.
Simple Menu
There are only four buttons in a vertical line (including the power button) on top, so I figured I should be able to figure it out. The second button from the bottom has what looks like a menu diagram. I pushed it once and, sure enough, the menu popped up with three choices: color, brightness and setup. Below that are two clear instructions: "menu to accept" and "power to cancel." That's simple enough.
On the top, the four button choices are (in order): "Power," "Plus" (with an up arrow), "Menu" and "Minus" (with a down arrow).
I selected the first item on the menu: "color." I quickly found out users can select one of the following: white hot, black hot, sepia, iron and IstAlert. Personally, for hunting I like the IstAlert setting. When animals are coming in they are easy to detect against the shades of gray background. For tactical uses, white hot or black hot seems to be the norm among the tactical guys I have talked to.
From there I selected "Brightness." It is exactly what you would expect: You simply adjust overall brightness of the screen, toggle up or down with the arrows for the desired brightness and move on.
Under "Set up" there is a whole host of choices: reticle color, reticle style, zero adjust and advanced. When selecting reticle color, users can choose between red, green, white or black. Under "Reticle style" there is a thin crosshair, a duplex crosshair and a heavy German-style reticle, which is my favorite for hunting pigs and predators.
The zero adjust setting is straightforward and has adjustments for horizontal and vertical. The whole unit is digital, so unlike a traditional scope where the crosshairs physically adjust, the ThermoSight RS adjusts digitally, and from what I saw at the range, very precisely.
Adjustable Power
When not in the menu mode, the "Plus" and "Minus" buttons control the power of the scope, albeit digitally. Essentially, the model I tested could be adjusted from 1.1-9 power by zooming in or out with the controls. Of the six different models available FLIR offers: 1x, 1.25-5x, 2.25-9x, 4-16x, 1.1-9x and 2-16x.
Power Aplenty
The run time — even in winter weather — is approximately four hours. Considering the scope is only going to be used for short periods of scanning and shooting, this equates to about a full weekend of hunting. To extend battery life, users can also select in the menu several standby times. If the battery does run low, it is easily charged by a micro USB cable. We charged it at home with a wall plug and in the field from a standard 12-volt lighter port with a USB adapter.
Testing
We used the ThermoSight RS under various conditions: indoors in total darkness, outside in extreme cold and snow, and at the range. The resolution was always sharp and, depending on settings, showed great separation between even minute heat sources. At the range we found the accuracy of adjustments were excellent and the point of impact never shifted. We only tested the unit on a .223, but FLIR warranties all six of these units up to .308 in an AR platform.
Video Capture
Another unique feature of the ThermoSight RS is that it can be connected to a small DVR — such as the LawMate PV-500L2 — to capture real-time video on an SD card. Simply plug the DVR into the micro USB port on the ThermoSight and it transmits the screen directly to the DVR for recording.
Summary
If hog hunting and predator calling are taking up more and more of your free time, you really need to try doing it after dark — it opens up a whole new dimension to the effectiveness of your hunting. Of all the methods for night hunting I've tried — spotlights, night vision and thermal — thermal has been the most effective.
The only barrier to entry has traditionally been price. Although the ThermoSight RS line isn't exactly cheap, it is more affordable than ever. A quality, easy-to-use product at a third of the traditional price€¦what more could you ask for?
Lightweight Optic
FLIR kept weight to a minimum on the
FLIR ThermoSight RS, which tips the scales at only 1 pound 12.8 ounces — even with the quick detach mount installed.
Quick Detach
With a quick detach mount installed, the
FLIR ThermoSight RS is easy to mount and dismount as need arises.
Adjustable Color
All of the reticles can be modified for color. Choices include red, green, black and white to fit the background as well as the setting. We found with white hot, the red or green reticle showed up best.
German Reticle
For fast moving targets where speed is more important than pinpoint accuracy, the heavy German reticle is ideal. It draws the eye in and stands out clearly against a target. We took the
FLIR ThermoSight RS out behind the office at night — not attached to a rifle — to demonstrate its use.
Adjustable Color
All of the reticles can be modified for color. Choices include red, green, black and white to fit the background as well as the setting. We found with white hot, the red or green reticle showed up best.
Simple Buttons
The controls are so easy even an editor can figure it out — no complex instruction manual needed. The four buttons control zoom, power and menu function — settings which are intuitive and easy to navigate. The zoom buttons even have embossed arrows on them for sightless use after dark.
Adjustable Color
All of the reticles can be modified for color. Choices include red, green, black and white to fit the background as well as the setting. We found with white hot, the red or green reticle showed up best.
Quick Caps
The
FLIR ThermoSight RS series is the next advancement in weapon-mounted thermal sighting at a price that is a significant reduction from other models. Another great feature is the easily removable cap system.
